Es ist schon länger still geworden hier im Blog – Derzeit arbeite ich viel am OpenBikeSensor mit. 
(English) Building a flaglight for my recumbent bike
Using those dipswitch-controlled rf switches with home-assistant

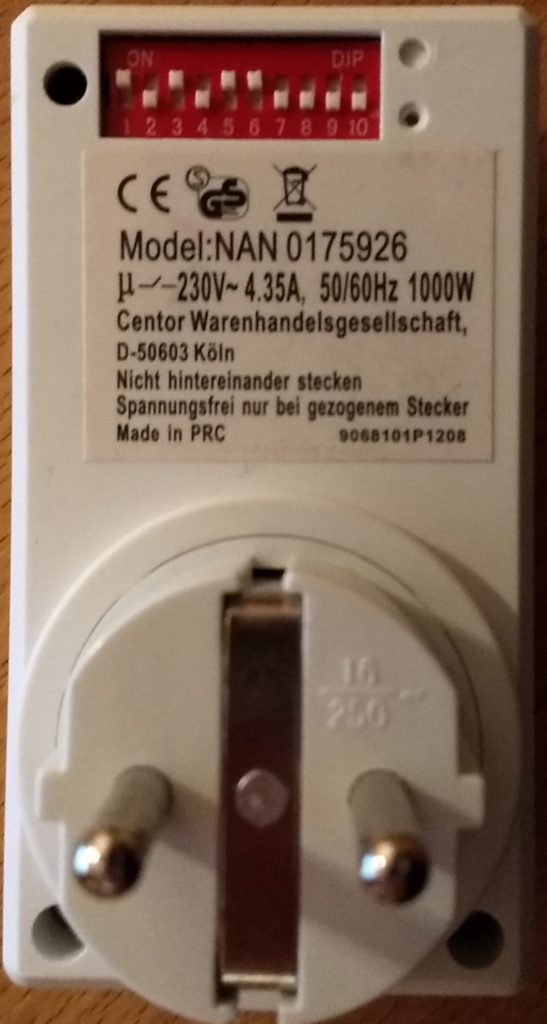
Ich benutze einige dieser billigen Funksteckdosen mit Mäuseklavier (dip-switch) auf der Rückseite. Die will ich natürlich auch mit homeassistant benutzen. Leider braucht die von homeassistant verwendete rpi-rc bibliothek einen Integer als Code. Da ich keinen Konverter finden konnte hier mein quick-n-dirty Konverterscript:
 !/usr/bin/env python3
 import argparse
 def codify(code):
     return code.replace("0", "00").replace("1", "01")
 parser = argparse.ArgumentParser(description='Sends a decimal code via a 433/315MHz GPIO device')
 parser.add_argument('code', metavar='CODE', type=str,
                     help="zeroes and ones from the dip switch ('up'=1, 'down'=0)")
 args = parser.parse_args()
 code= args.code.replace('1','3').replace('0','1').replace('3','0')
 code_off= codify(code+'00')
 code_on= codify(code+'01')
 print("off: {}".format(int(code_off, 2)))
 print("on:  {}".format(int(code_on, 2)))
Ruft man es mit der Einstellung des Mäuseklaviers aus dem Bild als Nullen und Einsen auf:
python dipswitch_convert.py 1010110000
 off: 1115472
 on:  1115473
Bekommt man die Integercodes für an und aus, die man mit Homeassistant oder der rpi-rf Kommandozeile verwenden kann:
rpi-rf_send -g 5 1115472
Raspberry Pi Smartmeter Lesekopf für 1€ selbst bauen.
WordPress dockerisiert
Die Frau setzt jetzt auch ein Blog auf. Da gerät man schnell ins Spielen. Während dieses Blog hier noch altbacken mit php und mysql auf dem Server läuft habe ich für das neue ein Team aus Dockercontainern aufgesetzt:
Für die automatische Einrichtung ein Trio aus Containern basierend auf diesem compose file:
- nginx als reverse-proxy
- jwilder/docker-gen zum automatischen erstellen passender vhost-konfigurationen für den reverse proxy. Einfach die passende Umgebungsvariable
-e VIRTUAL_HOST=your.domain.comsetzen, und nginx richtet den passenden Vhost ein und leitet ihn auf den exponierten port weiter. - jrcs/letsencrypt-nginx-proxy-companion zum automatischen Abruf passender Letsencrypt SSL zertifikate für die erstellten Vhosts.
Darunter dann ein angepasstes docker-compose.yml für das übliche Paar aus WordPress-container und *sql-container. Hauptanpassung (neben dem verschieben des WordPress-folders auf ein directory volume für einfachere anpassungen):
     environment:
       VIRTUAL_HOST: <vhost-1>.de,<vhost-2>.de...
       LETSENCRYPT_HOST: <vhost-1>.de,<vhost-2>.de...
       LETSENCRYPT_EMAIL: <letsencrypt-mail>
Damit funktioniert dann auch das automatische Erstellen eines vhosts.
Die Nginx-reverse-proxy-lösung macht es supereinfach neuen Containern gleich einen funktionierenden Vhost mit SSL zuzuteilen. Dabei braucht man fürs Aufsetzen auch wenig länger als für die manuelle SSL-Konfiguration eines einzelnen Vhosts. Sobald man den zweiten Container mit SSL versorgen möchte oder einen neuen Vhost hinzufügt hat man diese Zeit wieder drin.
(English) Setting up pyduofern
Duofern Rolladenmotoren mit Homeassistant
English version of this post here
Homeassistant ist mein Frontend der Wahl für Hausautomatisierung. Schönes Interface, in Python geschrieben, und leicht anzupassen. Angefangen habe ich damit wegen des Mysensors-Supports.
Letztes Jahr ging es dann daran, die Rolladenmotoren auszusuchen. Leider versuchen die meisten Hersteller, ihre eigenen proprietären Lösungen in den Markt zu drücken. Homeassistant unterstützt zwar ein paar dieser Lösungen, aber man muss sich trotzdem noch oft ein schweineteures Gateway anschaffen, um mit den Komponenten reden zu können. Für mich war es zusätzlich schwierig, weil die installierten Rolläden mit einem Gurt daherkamen und der Rolladenkasten aus Stahlblech ist und so eine winzige Öffnung hat, dass es nicht mit vertretbarem Aufwand möglich ist, Rohrmotoren zu installieren.
Am Ende habe ich mich dann für Rademacher entschieden. Aus Faulheit: Gurtwickler für Einbau- oder Aufputzmontage mit Möglichkeit zur Funkfernbedienung. Die Entscheidung fiel auf sechs RolloTron Standard DuoFern. Homeassistant unterstützt zwar Duofern nicht von Haus aus. Die Perl-basierte Hausautomatisierung FHEM unterstützt aber das Duofern Protokoll mithilfe eines preislich akzeptablen USB-Sticks von Rademacher.

Ich traute mir zu, den Perl-Code für Homeassistant zu portieren. Nach ein paar Wochen hatte ich die Rolladensteuerung mit Homeassistant dann im Juni 2017 am Laufen. Pünktlich, um im Sommer die Rolläden nach dem Stand der Sonne zu fahren und das Haus schön kühl zu halten. Das Ergebnis findet sich als pyduofern auf meinem github.
Manually setting firewall rules for the Synology DSM openvpn interfaces
I keep forgetting how to do this so I’m finally gonna write it down. Synology DSM does not allow you to define arbitrary firewall rules. I especially want to define more paranoid firewall rules attached to openvpn connections. Sadly the GUI does not know about selective firewall rules for these so I had to do it myself. Synologys openvpn client calls
/usr/syno/etc.defaults/synovpnclient/scripts/ovpn-up
once the connection is established and
/usr/syno/etc.defaults/synovpnclient/scripts/ip-down
on disconnect. To define my own firewall rules I figured I would have to add to these two scripts. Unfortunately synology only sets its firewall rules some time after the scripts have run. So when I just add my own firewall rules to the two scripts, they are overwritten seconds later by synologys firewall. My solution is the following: at the end of the synology scripts
ovpn-up
and
ovpn-down
I add my own firewall setup script via:
# above here is synologys original code
# save the return code of the synology ip-up/down logic
returncode=\$?

# call my script and send it to the background
nohup /opt/bin/iptables.sh &

# pass the original return code to the calling process
exit $returncode
In my own firewall script I begin with:
sleep 10
before I proceed to remove the synology firewall rules and replace them with my own.
WARNING: DSM Updates may overwrite your custom settings. Whenever you update DSM make sure that your settings are preserved.
Vectorized vortex clock
The Doctor Who intro features a vortex clock. Find it on youtube here (left of the two clips). I went through some pain to vectorize it in halfway decent quality in preparation of building a Doctor Who themed wall clock. In case anyone else wants an SVG version here is my amateur attempt. I know a lot could be done to make the SVG way smaller (probably the image could easily fit into 1/10 the size). My main goal was to get something that prints decently with a laser printer to iron on an aluminum plate, and this SVG is sufficient for that purpose.
Dynamic pdfs with pdflatex and ocg-p
Ever since I saw the microtype manual, I wanted to have something similar. The amazing thing about it is that you can switch on and off different microtype options and observe the resulting PDF output,
I now found the package ocg-p which allows to generate pdfs with dynamically switchable layers similar to the above. I built a demonstration which switches between a greek epigraph and its translation by clicking.
The code I used is the following, you can find the resulting PDF output here. The dynamic features only work in dedicated PDF readers (try opening with Acrobat):
\tikzset{external/export next=false}

\begin{tikzpicture}[node distance=3cm,every state/.style={fill=green!20},auto]
\begin{ocg}{edges}{ocedgesid}{1}
\draw[opacity=0] (-5,4)--(0,0);
\end{ocg}
\begin{ocg}{english}{german}{0}
\node[anchor=south east] at (0,0) { \toggleocgs{greek german}{I know that I know nothing}};
\node[anchor=north east] at (0,-0.2) { \toggleocgs{greek german}{\textit{Socrates}}};
\draw (-2,-0.1)--(0,-0.1);
\end{ocg}
\begin{ocg}{greek}{greek}{1}
\node[anchor=south east,font=\selectlanguage{polutonikogreek}] at (0,0) { \toggleocgs{greek german}{Οἶδα οὐκ εἰδώς.}};
\node[anchor=north east,font=\selectlanguage{polutonikogreek}] at (0,-0.2) { \toggleocgs{greek german}{\textit{Σωκράτης}}};
\draw (-2,-0.1)--(0,-0.1);
\end{ocg}
